As most you all know SQL Server is now available on Linux platform. I know everyone was super excited about this news. Just imagine 5 years ago, if you tell someone how awesome it is to have SQL Server on Linux? I am sure, they would have laughed at you. But now it’s happening in reality. It is a BIG BIG BIG move from Microsoft to make SQL Server available on Linux. To know more about the announcement of SQL Server on Linux click here.


“SQL Server’s proven enterprise experience and capabilities offer a valuable asset to enterprise Linux customers around the world. We believe our customers will welcome this news and are happy to see Microsoft further increasing its investment in Linux. As we build upon our deep hybrid cloud partnership, spanning not only Linux, but also middleware, and PaaS, we’re excited to now extend that collaboration to SQL Server on Red Hat Enterprise Linux, bringing enterprise customers increased database choice.”-Paul Cormier, President, Products and Technologies, Red Hat
In this blog post we will see high level architecture,
How to install RHEL 7.2 on VMware Workstation, Run through some of the basic
commands and at last we will have our SQL Server installed on it with tools.
Linux Architecture
 |
| Thanks to Anthony Nocentino. Got this image from one of his PASS Virtual Chapters |
You can refer the below image to know what each directory represents

How to install Red Hat Enterprise Linux (RHEL) 7.2 on VMware
Workstation
You
can download free RHEL 7.2 ISO image from here and also get yourself registered on the Red Hat site because you will need your login details at later stage. Download VMware Workstation from here or you can use other providers as well.
After downloading, install you’re VMware Workstation and navigate to File-> New Virtual Machine (Ctrl + N).
Then select custom installation and click on next. On the next screen we can go with the default, click on next.

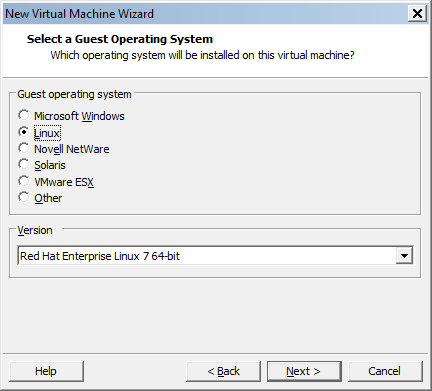
Now on the Guest Operating System Installation window, select “Installer Disc image file (iso): “ and provide the path to RHEL .ISO image file with file name, click on next.

On the next window, select Linux under Guest operating system and on the version drop down select ‘Red Hat Enterprise Linux 7 64-bit’.
Enter the virtual machine name and location where its supported files should be placed.

Select the number of processors. I have selected total processor core as 4.

Provide 4 GB of memory to the OS as that is one of the prerequisite for installing SQL Server on Linux (Approx you'll need at least 3.5 GB). On the network type, select the default type “network address translation (NTA)”. On I/O Controller types select “LSI Logic” and click on next. Disk type as ‘SCSI”.
On the next window to select the disk, we can use a new virtual disk since this is a fresh installation for demo.

Allocate 25 GB of disk size and split virtual
disk into multiple files.
Note: When I tried to configure it with single virtual disk
file. During the OS start-up it was not able to see the disk files. When I
tried with splitting the virtual disk into multiple file sit worked.

On the next window provide the path where you want to place all the virtual disk files and click on next. Now we will end up with the final screen which will give you a summary about all inputs which we provided. You can just review it once and click on finish.
Now let’s power on the virtual machine to complete the OS installation.
Select Install Red Hat Enterprise Linux 7.2 and hit Enter.

Setup will load other things and you will land at the below
screen to select the language. Select your appropriate language and click
on continue

Now you will be at Installation Summary Page. Set the Time
Zone and language under Localization. Click on Security and select default
profile, click on done.

Under Software, click on ‘Software Selection”. Select “Infrastructure
Server” under base environment. You can also select server with GUI. But for
this demo I am using Infrastructure Server.

Click on Installation destination under system and select
the local standard disk which we configured earlier.

KDUMP is enabled by default (for this demo I will be disabling). Click on KDUMP and uncheck “Enable KDUMP” and click on done
Click on Network & Host Name and turn on the Ethernet.

Now we are all set to start the installation. On the summary
page click on Begin Installation.
So far so good. Our installation is started and
we are still left with couple of tasks

-Set root password (Root user is something like Administrator user which we have in windows. It’s a super user with all access to the box)
-Create new user
Once you completed the above two steps, wait for the installation to complete. Finally click on reboot to complete the installation and you’re all set to use your RHEL virtual machine.

Above listed commands are easy for practising and you get
some hands on with the OS (if you are new to Linux world, like me).
Installing SQL Server vNext CTP 1.2 on RHEL 7.2
Here is the link to Microsoft documentation on installing SQL Server vNext on RHEL.
I have logged in with root user, so I am leaving the first
step from the documentation and then we have to download the Microsoft SQL
Server Red Hat Repository Configuration file by running the below command.
curl https://packages.microsoft.com/config/rhel/7/mssql-server.repo > /etc/yum.repos.d/mssql-server.repo

Once the repository is configured. Now we can install SQL Server by running below command
yum install –y mssql-server

In the above screenshot (during the mssql-server package
installation), there is a message saying “This
system is not registered with Red Hat Subscription Management. You can use
subscription-manager to register it.”
Follow the below steps to completed the registration for Red Hat Subscription
-Run subscription-manager register. This will ask you to enter the username which is your email ID using which you registered in Red Had site and enter the password.

Now our registration is successfully and we also have a registration ID generated.
Use below command to check list of subscriptions
subscription-manager list
By doing this we can fix the above warning message. But wait, still its not completed. Next you would be seeing a message “This system is registered to Red Hat Subscription Management, but is not receiving updates. You can use subscription-manager to assign subscriptions”.
Now we have to assign the registered ID for subscriptions. Run the below command to get the Pool ID
Subscription-manager list
Get the Pool ID and use it in the below command for subscription.
subscription-manager attach --pool=POOL_ID
Once our installation is completed and there is a message saying run this setup file to complete the setup. So this configuration file will set the password for SA account. And just for our learning purpose we will not start the service now we try to start the service manually.
/opt/mssql/bin/sqlservr-setup

With this we have completed the installation of SQL Server. Now we have to install tools, so that we can connect to the SQL instance.
First we have to download the configuration files from the repository using below command
curl https://packages.microsoft.com/config/rhel/7/prod.repo > /etc/yum.repos.d/msprod.repo
Once the repositories are loaded and then we are good to go with installation by running the below command
Yum install –y mssql-tools

Before connecting to the SQL Instance we have to start the
service. Now let’s see how to check the service status and start it.
To get the list of services running on your machine run the
below command
Systemctl
To get the service status of SQL Server
Systemctl status msssql-server

It says service is disabled and its inactive (dead). So
first we have to enable the service by running the below command
Systemctl enable mssql-server

Run the below command to start the service
Systemctl start mssql-server

When you run the above command with –l parameter it gives
you more cool information.

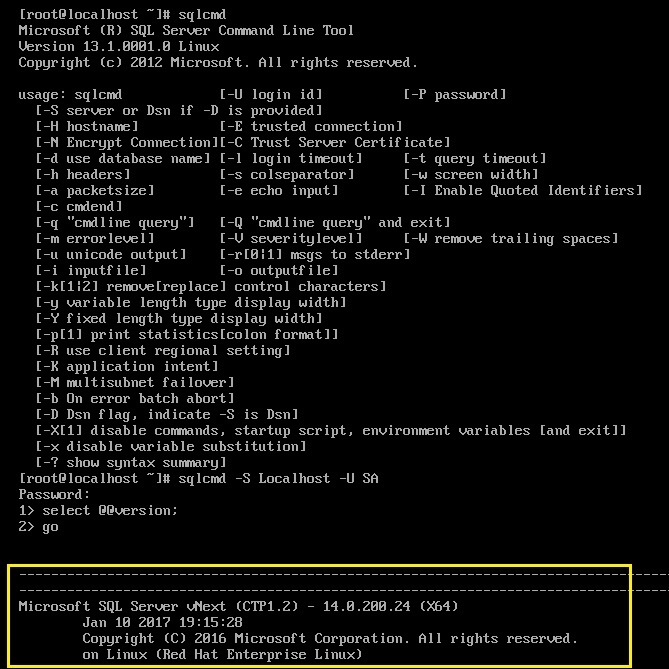
And finally we are going to connect to our SQL Server vNext
instance!!
Sqlcmd –S Localhost –U SA #Hit enter and provide the
password for service account
Happy learning!!
Cheers,
Naveen