Wednesday 6 September 2017

Disk block size with PowerShell

Recently while working with one of the customer engagement, we had a discussion about recommendation on disk block size for SQL Server.

Do you need to worry about disk block size?
I would suggest you to read below articles for getting better understanding on this topic

Disk Partition Alignment Best Practices for SQL Server
WHAT IS SQL SERVER’S IO BLOCK SIZE?

Post discussion, the next question was how do we check the disk block size for a given server?
You can do it from command line using FSutil utility. But let's do it with PowerShell. Here is the code which I ran to get the block size details

Get-CimInstance -ClassName Win32_Volume -Filter "FileSystem='NTFS'" | Select-Object Name, Label, BlockSize | Format-Table -AutoSize

OR

Get-WmiObject -Class Win32_volume -Filter "FileSystem='NTFS'" | Select-Object Name, Label, BlockSize | Format-Table -AutoSize

Click here, if you are confused whether you should use Get-CimInstance or Get-WmiObject  ☺


After showing it on one server, then customer gave me a list of SQL Servers on which we should get the similar details.

PowerShell makes things more simple. I got the server list in a text file and saved it on my client machine desktop. Open PowerShell and run the below code.

$ServerList = Get-Content 'C:\Users\user1\Desktop\ServerList.txt' 
Get-WmiObject -Class Win32_volume -Filter "FileSystem='NTFS'" -ComputerName $ServerList | Select-Object PSComputerName, Name, Lable, BlockSize | Format-Table -AutoSize

Here is the sample output. Just make sure you replace 'C:\Users\user1\Desktop\ServerList.txt' path as per your requirement.


Hope this helps

Cheers,
Naveen

Tuesday 22 August 2017

How to change MySQL port

Few days back I was working on a request to change the port for MySQL instance. I thought by writing a blog post would help other folks who are new to the MySQL database platform. This is not something new in MySQL world, but for me it was a new learning.
By default MySQL will be listening to port 3306. From security standpoint it’s not a good idea to run your instance with default port. To change the port all you have to do is edit the configuration file.

In Windows -> my.ini
In Linux -> my.cnf

Ok. Next question is, where is my configuration file? How can I locate it?

In windows

  • Open services.msc console. Look for your MySQL service
  • Right click MySQL service and open ‘Properties’.
  • Under ‘Path to execute’ you can find the my.ini location


"C:\Program Files\MySQL\MySQL Server 5.6\bin\mysqld.exe" --defaults-file="C:\ProgramData\MySQL\MySQL Server 5.6\my.ini" MySQL56


  • Open the configuration file and search for port, by default its 3306


  • I have changed it to 3333


You have to restart MySQL service to make the changes effective.
Let’s check if MySQL instance is listening to 3333 port. To check the port you can use below command from MySQL client.

SHOW VARIABLES WHERE VARIABLE_NAME LIKE 'PORT';


In Linux, configuration will be located in /etc/mysql/my.cnf. You have to open and follow the same process.

Note: Take backup of configuration file before making any changes

Hope this helps

Cheers,
Naveen

Sunday 25 June 2017

Getting started with Microsoft Azure SQL database

In this blog post we will see what is Azure SQL Database, how you can create one and play around with it. Microsoft documentation says, ‘Azure SQL Database is a relational database-as-a service using the Microsoft SQL Server Engine. SQL Database is a high-performance, reliable, and secure database you can use to build data-driven applications and websites in the programming language of your choice, without needing to manage infrastructure.’
As said above, you need not worry about managing your infrastructure, like patching the OS, managing windows security, Memory and CPU usage, etc. Only thing which you get and can work on with is SQL database which will reside on Cloud. It’s Just the database

Now let’s see how to create an Azure SQL Database. Firstly, you need to have an Azure subscription. You can go to Microsoft Azure page and get free 30 days trail to play with.
This is how the new home page looks like 😊 This portal has lots of stuffs.


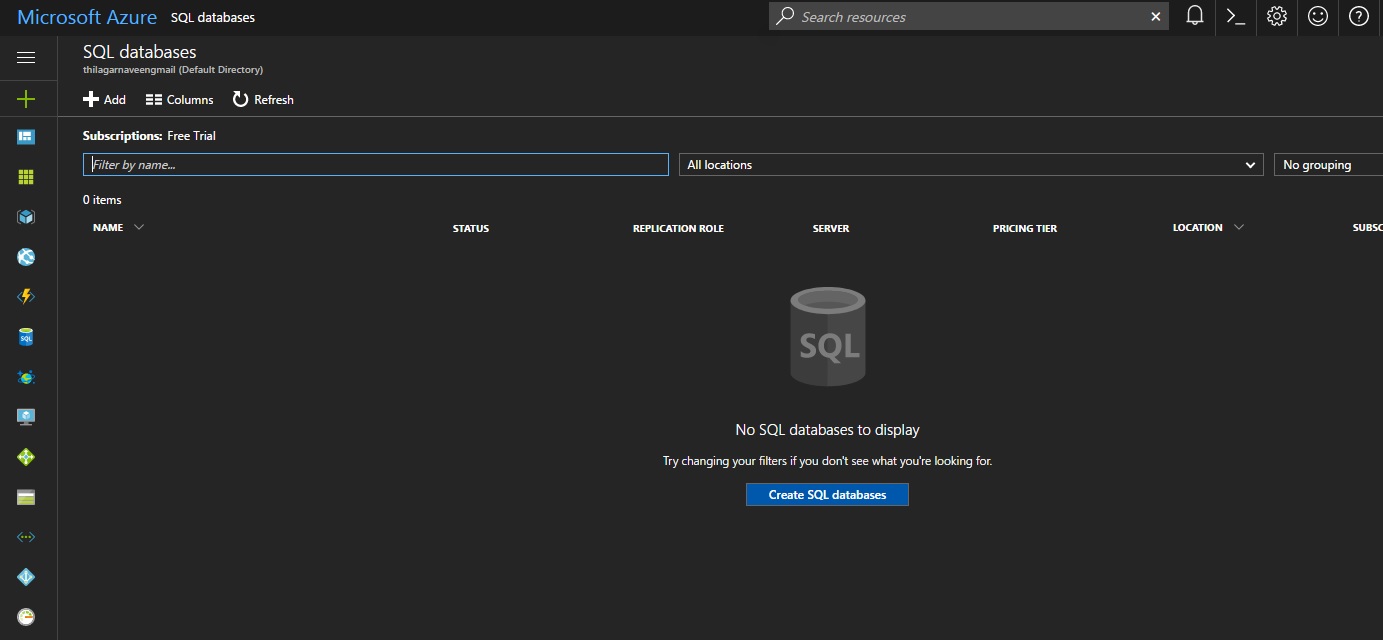
To create an Azure SQL database, click on SQL Databases on the left which will take you to this page.


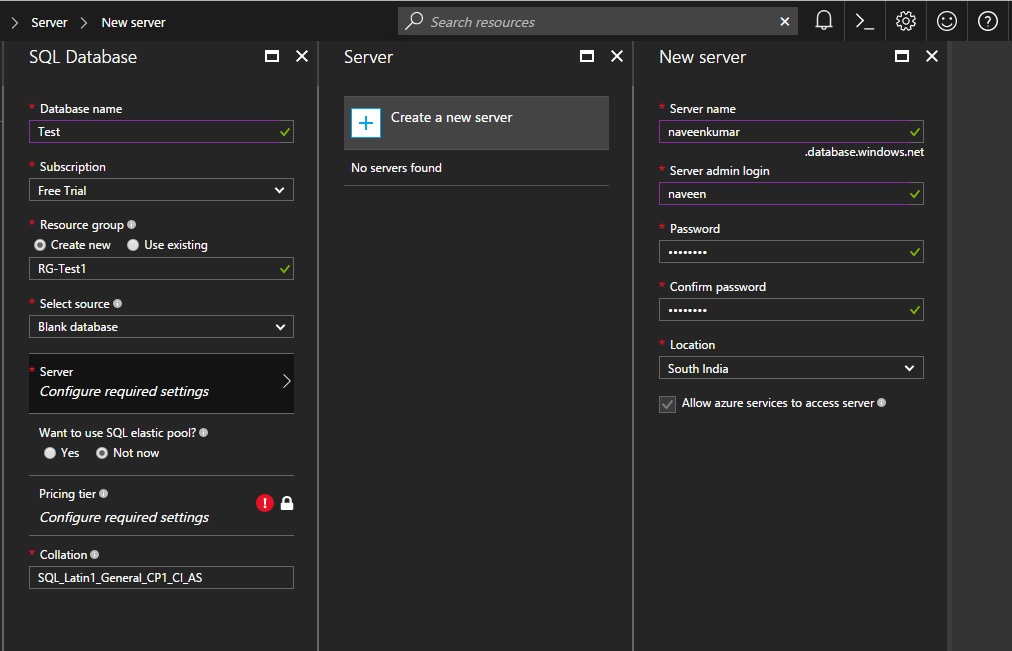
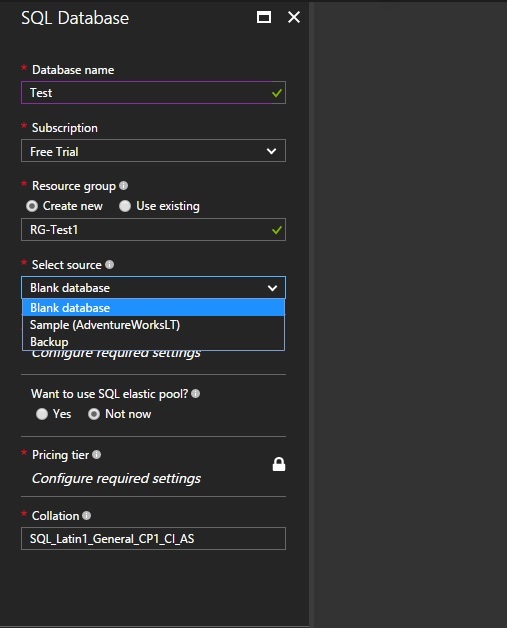
Now we have to provide some set of parameters to initiate the deployment.
Database Name- Would be your Azure SQL database name
Subscription- You need to choose which subscription you are going to use to this database.
Resource Group - A resource group is a container that holds related resources for an Azure solution. The resource group can include all the resources for the solution, or only those resources that you want to manage as a group. You can either create new one or use an existing resource group. You can also create the resource group separately.
Select Source – Provide the source for your database, if any. You get 3 options. Blank database, Sample AdventureWorks and backup. 


Next is server configuration
Server Name- Will be your SQL Server name on which the database is going to hosted
Server admin login – SQL login which will be created using which you can access the database
Password - Self explained
Location- This will decide on which data centre your data will reside. It’s always good to choose the one which will be closer to the users. So that you get better latency. Click here to get all Azure Regions


Next is the pricing tire where you have to decide DTU (Database Transaction Units). This is something very important because you are dealing with resources and money 😊

DTUs are most useful for understanding the relative amount of resources between Azure SQL Databases at different performance levels and service tiers. Microsoft guarantees a certain level of resources for that database (independent of any other database in the Azure cloud) and providing a predictable level of performance. This amount of resources is calculated as a number of Database Transaction Units or DTUs, and is a blended measure of CPU, memory, I/O (data and transaction log I/O). You can use Azure SQL Database DTU Calculator to determine the number of DTUs for your existing SQL Server database(s) as well as a recommendation of the minimum performance level and service tier that you need before you migrate to Azure SQL Database.

You need to measure below listed counters to determine the required DTU.
Processor - % Processor Time
Logical Disk - Disk Reads/sec
Logical Disk - Disk Writes/sec
Database - Log Bytes Flushed/sec

You get 4 service tires from which you have to choose
Basic - Best suited for a small database, supporting typically one single active operation at a given time. Examples include databases used for development or testing, or small-scale infrequently used applications.
Standard - The go-to option for cloud applications with low to medium IO performance requirements, supporting multiple concurrent queries. Examples include workgroup or web applications.
Premium - Designed for high transactional volume with high IO performance requirements, supporting many concurrent users. Examples are databases supporting mission critical applications.
Premium RS - Designed for IO-intensive workloads that do not require the highest availability guarantees. Examples include testing high-performance workloads, or an analytical workload where the database is not the system of record.

Click here to know more information about each tire. For this demo, I will be using Basic tire which is sufficient.


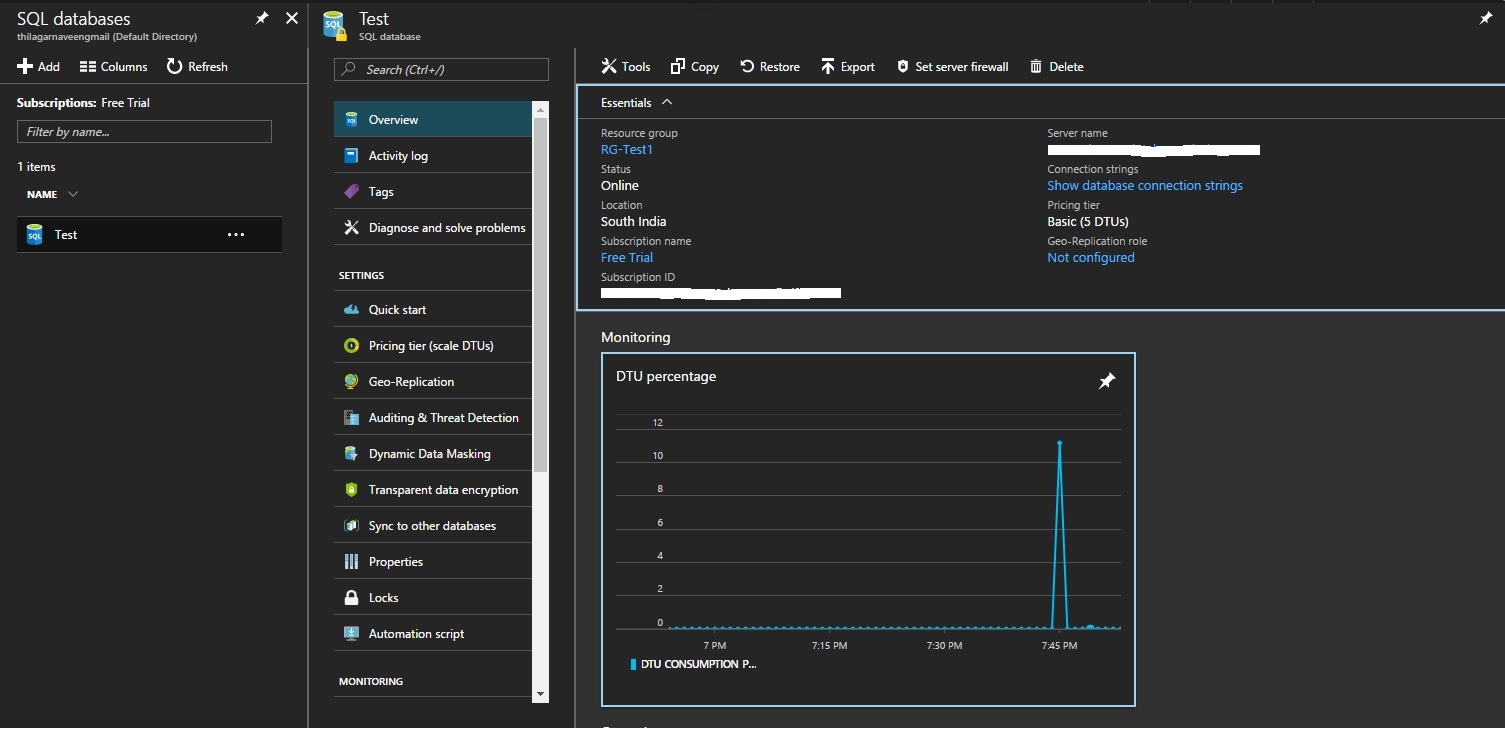
Then set your database collation and you are all set to create your database. Now we have successfully created a new Azure SQL database. 


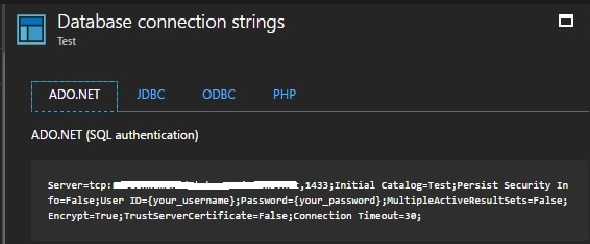
Now let’s look at the connection string, so that we can connect to our Azure SQL database from Management Studio. In the above pic, on the right side we have ‘Show database connection strings’. Once you click that, you will get different types of connection strings. We already have user name and password, in the ADO.NET string, we can get the server name.


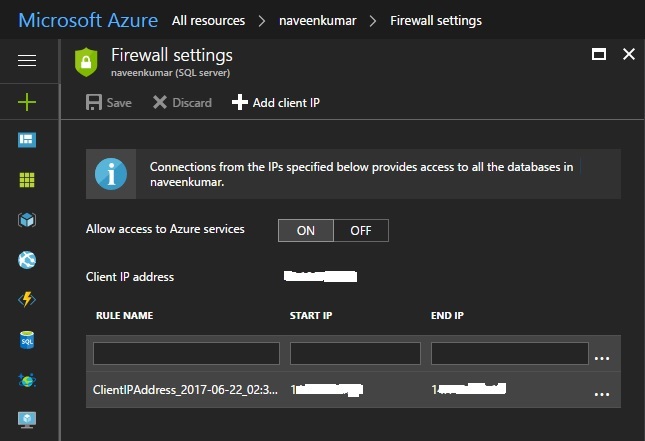
Now I will open my management studio on my local machine and will pass on all the details. We get a nice little screen which says, client IP address does not have access to the server.


Coolest thing about this window is, you just have to sign in with your Azure credentials and at the back it’s going to create a firewall rule which will allow connections from that particular machine. So now when I go back to the firewall settings in Azure portal, I can see we have a new firewall rule.


This is making our life really easy. You can still come here and create your own rules. Now I should be able to connect to my Azure SQL database without any issues.


Now it’s like your normal on premise database. You can just create your tables and load data. For Azure SQL database, query store will be enabled by default to keep track of everything. We get it with 10 MB if max size, so it should be ok. I guess this initial size depends on what type of service tire we choose, but I am not completely sure about this.


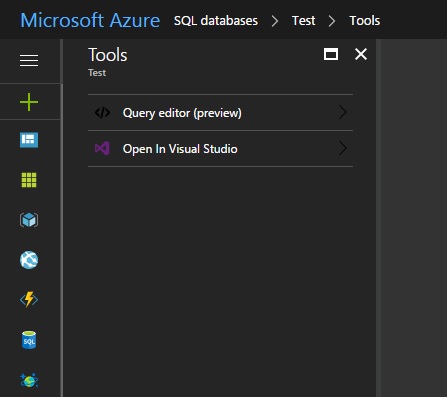
You can also use Tools in Azure Portal to run T-SQL commands. As of now we have Query editor which is in preview but works fine and visual studio.


Once you click query editor, you have to authenticate again by passing on your login credentials.


Hope this gives you a basic idea about Azure SQL database. On my next post on Azure, we will see about migrating on premise database to Azure SQL database.

Cheers,
Naveen

Wednesday 31 May 2017

MSSQL-SCRIPTER - New SQL Server Command Line Tool for generating T-SQL Scripts

Microsoft recently introduced two new command line tools for SQL Server

  • mssql-scripter tool enables developers, DBAs, and sysadmins to generate CREATE and INSERT T-SQL scripts for database objects in SQL Server, Azure SQL DB, and Azure SQL DW from the command line.
  • The DBFS tool enables DBAs and sysadmins to monitor SQL Server more easily by exposing live data from SQL Server Dynamic Management Views (DMVs) as virtual files in a virtual directory on Linux operating systems.

In this blog post we will see how to use mssql-scripter tool. You can use mssql-scripter on Linux, macOS, and Windows to generate data definition language (DDL) and data manipulation language (DML) T-SQL scripts for database objects in SQL Server running anywhere, Azure SQL Database, and Azure SQL Data Warehouse. This tool is built using Python, so to get this tool installed first you need to install Python on your machine. To download Python click here

After installing python, you can try and check the help for PIP. PIP is the package management system used to install and manage packages written in Python.


PIP --help


Now we are good to install the mssql-scripter tool. 

    Pip install mssql-scripter


To check the existence of the package

Pip show mssql-scripter


Let’s have a look at the general usage guide of the mssql-scripter tool.


This tools gives you lot of options to customize your scripting. I have just listed few below

--data-only -> By default only the schema is scripted. if supplied, generate scripts that contains data only.
--schema-and-data -> By default only the schema is scripted. if supplied, generate scripts that contain schema and data.
--target-server-version -> {2005,2008,2008R2,2012,2014,2016,vNext,AzureDB,AzureDW}. Script only features compatible with the specified SQL Version.
--target-server-edition -> {Standard,PersonalExpress,Enterprise,Stretch}. Script only features compatible with the specified SQL
--extended-properties -> Script the extended properties for each object scripted.
--logins -> Script all logins available on the server, passwords will not be scripted.
--object-permissions -> Generate object-level permissions.
--change-tracking -> Script the change tracking information.
--data-compressions -> Script the data compression information.

First let’s try with just scripting schema alone for a particular table [sales.SalesOrderDetail] in AdventureWorks database and write the output to a .sql file.

mssql-scripter -S SQLInstance\vNext -d AdventureWorks2012 --object-schema --include-objects [sales.SalesOrderDetail] >> Sales.sql


--target-server-version and --target-server-edition option looks interesting. I have enabled compression on SalesOrderDetail table which is an enterprise only feature.


Now I am going to script out the schema with specifying target version and edition as 2005 and standard respectively. 

mssql-scripter -S SQLInstance\vNext -d AdventureWorks2012 --object-schema --include-objects sales.SalesOrderDetail --target-server-version 2005 --target-server-edition Standard >> sales2005.sql

I was expecting some sort of warning/error about compression as this feature is not supported in the target version and edition. But in the output it had the syntax for data compression as well.


I am not sure, if I am missing something here. But still it’s the first release of this tool, I am sure this tool is going to be getting better in the future. With this command line tool, moving a database from higher version to lower version can be done in easier way. Instead of going through the Generate SQL Server Script wizardwith this tools it’s just simple one line of code and we are done!

I will explore more and will update my findings here. Stay Tuned

You can download this tool from here.

Thanks for reading!

UPDATE 1 - 02-Jun-2017
Above issue is reported on Microsoft GitHub repository -> https://github.com/Microsoft/sql-xplat-cli/issues/89

Cheers,
Naveen 

Wednesday 24 May 2017

SQL Server 2017 Hidden Gems – Part 2


In part-1, I discussed about tracking modified extent page counts.  Starting from SQL Server 2017 CTP 2.0 processor information is visible in sys.dm_os_sys_info dmv. This was another highly requested feature from the community. New columns which are added in sys.dm_os_sys_info dmv are socket_count, cores_per_socket, numa_node_count.

SELECT @@version as 'SQL Version', socket_count, cores_per_socket, numa_node_count FROM sys.dm_os_sys_info


Some of the other ways to get the processor information

Using PowerShell

Get-WmiObject -Class win32_processor | select DeviceID, SocketDesignation, NumberOfCores, NumberOfLogicalProcessors


Using System Information

Open run (Windows Key + R) -> Type msinfo32 -> Hit Enter


Hope this helps

Cheers,
Naveen


Saturday 29 April 2017

SQL Server 2017 Hidden Gems – Part 1

In this blog post series I will be covering the new features and enhancements brought in SQL Server 2017. With SQL Server 2017 CTP 2.0 release, new column modified_extent_page_count is introduced in sys.dm_db_file_space_usage to track differential changes in each database file of the database. This feature was requested by customers and community in this connect item.

With this, now you can configure your differential backup with an extra piece of code to determine the percentage of pages changed since last full backup. With large number of changes in the database, cost and time to complete differential backup is similar to that of full database backup so there is no real benefit of taking differential backup in this case but it can rather increase the restore time of database.

Let’s do a quick demo to see how it works

I am creating a new database and the running sys.dm_db_file_space_usage on the new database.

CREATE DATABASE vNext
GO
USE vNext
GO
SELECT modified_extent_page_count, * FROM SYS.dm_db_file_space_usage


As full backup will be the base for the differential backup, we are not seeing any pages to be tracked under modified extent page column. If you take a full backup and then run the same command, then you should see some value.
Now I am going to load some test data, take a full backup and then check the value in modified_extent_page_count column.

--Creating a test table and inserting 100 records
CREATE TABLE Test (ID INT IDENTITY(1,1), NAME CHAR(8000))
GO
INSERT INTO Test values ('This is a test data')
GO 100

--Perform a full backup of vNext database to create a base for differential backup
BACKUP DATABASE vNext to disk='NUL'

--Take a look at the modified_extent_page_count column
SELECT modified_extent_page_count, * FROM sys.dm_db_file_space_usage


Again I am inserting 500 more records to show that whatever changes we do on that file is being tracked

--Let's insert 500 more records
INSERT INTO Test values ('This is a test data')
GO 500

--Take a look at the modified_extent_page_count column
SELECT modified_extent_page_count, * FROM sys.dm_db_file_space_usage


Now let’s see what happens when you take a differential backup.

BACKUP DATABASE vNext TO DISK='vNext_Differential_1.bak' WITH DIFFERENTIAL


You can see 584 pages were processed in the data file with differential backup. This was the same number which was shown in modified_extent_page_count column.
Let’s do couple of backup test to see how the modified_extent_page_count column value changes. First, we’ll take a copy_only full backup

--value of modified_extent_page_count column
SELECT modified_extent_page_count AS 'Before full backup' FROM sys.dm_db_file_space_usage

--Copy only full backup
BACKUP DATABASE vNext TO DISK='NUL' WITH COPY_ONLY

--value of modified_extent_page_count column
SELECT modified_extent_page_count AS 'After COPY ONLY full backup' FROM sys.dm_db_file_space_usage


As expected, copy_only full backup will not make any change to the backup chain. Now let’s take a full backup of the database

--value of modified_extent_page_count column
SELECT modified_extent_page_count AS 'Before full backup' FROM sys.dm_db_file_space_usage

--Full backup
BACKUP DATABASE vNext TO DISK='NUL'

--value of modified_extent_page_count column
SELECT modified_extent_page_count AS 'After full backup' FROM sys.dm_db_file_space_usage


So once a fresh full backup is taken that will be the base for next differential backup. So modified_extent_page_count will have a new value.

Hope this helps. Please do share your thoughts in the comments below

Cheers,
Naveen

Wednesday 19 April 2017

What's new with SQL Server 2017?

Microsoft announced the preview for next release of SQL Server at Microsoft Data Amp. It’s SQL Server 2017!!!


Community Technology Preview (CTP) 2.0 is the first production-quality preview of SQL Server 2017, and it is available on both Windows and Linux. Click here to download SQL Server 2017 CTP 2.0.


Here are some of the exciting new features added to database engine

  • Adaptive Query Processing – Faster query processing with improved plan quality.
  • Store and analyse non-hierarchical relationships with Graph data support using node/edge query.
  • Resumable online index rebuild. Now you can pause and resume the online index rebuilds
  • Cluster-less Availability Groups for scaling read operations. But with you scale up for read operation, you will not get high availability.
Syntax to create AG without cluster looks like
CREATE AVAILABILITY GROUP [AG-NAME] WITH (CLUSTER_TYPE=NONE)

What’s available on SQL Server on Linux?

Operational Features
  • Support for RHEL, Ubuntu, Docker
  • SQL Server Linux on Docker
  • Package based installs, Docker images
  • Support for Open shift, Docker Swarm
  • Failover clustering through pacemaker 
  • Availability Groups
  • SQL Agent
  • Replication
  • SCOM management Pack
  • Log shipping
  • DMV's
  • Full-Text Search
  • Transparent Data Encryption (TDE)

Programming Features
  • In memory OLTP
  • Columnstore
  • Python
  • Compression
  • Always Encrypted
  • Row Level Security
  • Dynamic Data Masking
  • Service broker
  • Change Data Capture (CDC)
  • Partitioning
  • Auditing
  • CLR
  • JSON
  • XML
Security
  • Active Directory authentication coming soon!
What is not available on Linux?
  • DB Mail
  • Alerts
  • FileTables
  • Stretch DB
  • PolyBase
  • XPs
  • Mirroring
  • VSS Snapshots
Other services which are not available on Linux
  • SSAS
  • SSRS
  • SSIS
  • R service
  • MDS
  • DQS

Windows based SQL Server tools like SSMS and Profiler works when connected to SQL Server on Linux. Native command line tools like SQLcmd, bcp and sqlpackage are also supported on Linux.
Microsoft is also planning to release a new cross platform database admin GUI tool for doing administrative tasks. WOO HOO! This tool will work on Windows, Linux and Mac OS. And this is actually an open source project which will be available on GitHub.

Go-ahead and get your copy of SQL Server 2017 CTP and start exploring these new features

Cheers,
Naveen

Sunday 9 April 2017

Always good to know your GUEST in SQL Server

Few days back came across an interesting issue, which was new for me. Application owner buzzed me and raised concerns about the SQL Server security setup.

App.Owner: We have some serious issue with our database security. I fear wrong people having elevated access to our data.
Me: Ok, Let me have quick look and get back to you.
App.Owner: Yes please. We need to fix this now.
Me: Did a quick check and everything seems to be fine. You’re ID with db_owner and other users with read access to the database.
App.Owner: I was also under the same impression. But today, I came to know there are other users who were also are also able to modify the data. That’s not at all good.
Me: hmm that’s strange. I will do a complete check to figure out the loophole.
App.Owner: Thanks. I will wait to hear from you.
Me: Okay. Ahh Found the suspect. All those privileges were getting transmitted from guest user. I could see someone had mistakenly provided extra permission to guest user, which is not at all required for this environment. Now things are back to normal. Please have a look from your end and let me know you if you have any questions
App.Owner: Great! Thanks for fixing this. Have a good day
Me: You too, have a good day!

In my case issue was with guest user permission. Let’s see the same in demo

-First we will create a new database named ‘TESTDB’. Then will check the status of guest account.


Note: If guest user is enabled in Model database, the same will get applied to newly created database

-Now we will create a SQL Login ‘UserA’, a new table ‘EPL’ and insert 3 records.


We have just created a SQL Login it’s not mapped to any of the database. At instance level also no permission is provided.

Now let’s try doing a simple select on table EPL using UserA.


As expected, ‘UserA’ is not able to fetch the data from TESTDB. Now let’s try enabling and providing read and write permission to ‘Guest’ user in TESTDB. You cannot enable/disable Guest user through GUI, it can be done only with T-SQL.

To Enable Guest Account:

USE [DATABASE_NAME]
GO
GRANT CONNECT TO GUEST
GO

To Disable Guest Account:

USE [DATABASE_NAME]
GO
REVOKE CONNECT TO GUEST
GO


Command completed successfully. Now let’s try running some commands.


So now UserA is able to read and insert records in TESTDB. The same task can be performed by all users associated with the instance. When Guest user is enabled, it will authorize access for logins which are not mapped to the database.

Things to know about Guest user

  • It’s always recommended to disable guest user for user database, unless you have any specific/special requirement.
  • Guest user cannot be dropped, but can be disabled/enabled.
  • Guest user cannot be disabled for Master and Tempdb database.
  • On msdb database guest user should not be disabled. If you have any plans to do so, please read this.

Do you use Guest user? On what scenarios you use them?
Please share your thoughts via comments below.
 
Cheers,
Naveen

Monday 27 March 2017

Enabling trace flags in SQL Server vNext CTP 1.3 on Linux

In my previous post, I have shown you some of the trace flags which are enabled by default on SQL vNext CTP 1.3 Instance on Linux.


In this post we will see how to add trace flags to SQL Startup parameter on Linux.

In windows world, to add trace flag to start-up parameter all we had to do is open SQL configuration manager-> Right click on SQL Service and open its properties -> Navigate to startup parameters tab and add your trace flags.


In Linux world, everything is at file level. All configuration items are stored in a file. To make configurational changes to SQL Instance we will be using mssql-conf under /opt/mssql/bin/.


Now let’s see how to add trace flag to SQL Startup Parameters

If you are already in /opt/mssql/bin/ directory just run

./mssql-conf traceflag 1117 1118 1222 3226 on

Say if you are in /opt directory. Your command will be something like

./mssql/bin/mssql-conf traceflag 1117 1118 1222 3226 on


Now we have successfully added trace flag 1117, 1118, 1222 and 3226. We have to restart SQL service to apply these changes.

To check the status of SQL Service

Systemctl status mssql-server.service


To restart SQL Service

Systemctl restart mssql-server.service

Now let’s connect to the SQL instance and check if the trace flags are enabled


In the next blog post, I will show you how to change your SQL Instance collation on Linux.

Cheers,
Naveen

Thursday 2 March 2017

Trace Flags on SQL Server vNext CTP 1.3

Mid of February Microsoft announced the release of SQL Server vNext CTP 1.3. Below is the list of some of the key enhancements done on database engine


  • Indirect checkpoint performance improvements.
  • Cluster-less Availability Groups support added.
  • Minimum Replica Commit Availability Groups setting added.
  • Availability Groups can now work across Windows-Linux to enable cross-OS migrations and testing.
  • Temporal Tables Retention Policy support added,
  • Online non-clustered columnstore index built and rebuild support added


One thing which surprised me is by default you get a set of trace flags enabled globally. SQL Server vNext CTP 1.3 we have 7 trace flags enabled by default whereas in CTP 1.2 we'll get 6.

Click on the image for better readability


Have you used the below listed trace flags?
Can you share your thoughts on the comments section about these traces flags?

T835
T2563
T3105
T5504
T6529
T8020
T8415

In the next blog post we will see how to set trace flag on SQL startup parameter on Linux.

Cheers,
Naveen