Saturday, 29 April 2017

SQL Server 2017 Hidden Gems – Part 1

In this blog post series I will be covering the new features and enhancements brought in SQL Server 2017. With SQL Server 2017 CTP 2.0 release, new column modified_extent_page_count is introduced in sys.dm_db_file_space_usage to track differential changes in each database file of the database. This feature was requested by customers and community in this connect item.

With this, now you can configure your differential backup with an extra piece of code to determine the percentage of pages changed since last full backup. With large number of changes in the database, cost and time to complete differential backup is similar to that of full database backup so there is no real benefit of taking differential backup in this case but it can rather increase the restore time of database.

Let’s do a quick demo to see how it works

I am creating a new database and the running sys.dm_db_file_space_usage on the new database.

CREATE DATABASE vNext
GO
USE vNext
GO
SELECT modified_extent_page_count, * FROM SYS.dm_db_file_space_usage


As full backup will be the base for the differential backup, we are not seeing any pages to be tracked under modified extent page column. If you take a full backup and then run the same command, then you should see some value.
Now I am going to load some test data, take a full backup and then check the value in modified_extent_page_count column.

--Creating a test table and inserting 100 records
CREATE TABLE Test (ID INT IDENTITY(1,1), NAME CHAR(8000))
GO
INSERT INTO Test values ('This is a test data')
GO 100

--Perform a full backup of vNext database to create a base for differential backup
BACKUP DATABASE vNext to disk='NUL'

--Take a look at the modified_extent_page_count column
SELECT modified_extent_page_count, * FROM sys.dm_db_file_space_usage


Again I am inserting 500 more records to show that whatever changes we do on that file is being tracked

--Let's insert 500 more records
INSERT INTO Test values ('This is a test data')
GO 500

--Take a look at the modified_extent_page_count column
SELECT modified_extent_page_count, * FROM sys.dm_db_file_space_usage


Now let’s see what happens when you take a differential backup.

BACKUP DATABASE vNext TO DISK='vNext_Differential_1.bak' WITH DIFFERENTIAL


You can see 584 pages were processed in the data file with differential backup. This was the same number which was shown in modified_extent_page_count column.
Let’s do couple of backup test to see how the modified_extent_page_count column value changes. First, we’ll take a copy_only full backup

--value of modified_extent_page_count column
SELECT modified_extent_page_count AS 'Before full backup' FROM sys.dm_db_file_space_usage

--Copy only full backup
BACKUP DATABASE vNext TO DISK='NUL' WITH COPY_ONLY

--value of modified_extent_page_count column
SELECT modified_extent_page_count AS 'After COPY ONLY full backup' FROM sys.dm_db_file_space_usage


As expected, copy_only full backup will not make any change to the backup chain. Now let’s take a full backup of the database

--value of modified_extent_page_count column
SELECT modified_extent_page_count AS 'Before full backup' FROM sys.dm_db_file_space_usage

--Full backup
BACKUP DATABASE vNext TO DISK='NUL'

--value of modified_extent_page_count column
SELECT modified_extent_page_count AS 'After full backup' FROM sys.dm_db_file_space_usage


So once a fresh full backup is taken that will be the base for next differential backup. So modified_extent_page_count will have a new value.

Hope this helps. Please do share your thoughts in the comments below

Cheers,
Naveen

Wednesday, 19 April 2017

What's new with SQL Server 2017?

Microsoft announced the preview for next release of SQL Server at Microsoft Data Amp. It’s SQL Server 2017!!!


Community Technology Preview (CTP) 2.0 is the first production-quality preview of SQL Server 2017, and it is available on both Windows and Linux. Click here to download SQL Server 2017 CTP 2.0.


Here are some of the exciting new features added to database engine

  • Adaptive Query Processing – Faster query processing with improved plan quality.
  • Store and analyse non-hierarchical relationships with Graph data support using node/edge query.
  • Resumable online index rebuild. Now you can pause and resume the online index rebuilds
  • Cluster-less Availability Groups for scaling read operations. But with you scale up for read operation, you will not get high availability.
Syntax to create AG without cluster looks like
CREATE AVAILABILITY GROUP [AG-NAME] WITH (CLUSTER_TYPE=NONE)

What’s available on SQL Server on Linux?

Operational Features
  • Support for RHEL, Ubuntu, Docker
  • SQL Server Linux on Docker
  • Package based installs, Docker images
  • Support for Open shift, Docker Swarm
  • Failover clustering through pacemaker 
  • Availability Groups
  • SQL Agent
  • Replication
  • SCOM management Pack
  • Log shipping
  • DMV's
  • Full-Text Search
  • Transparent Data Encryption (TDE)

Programming Features
  • In memory OLTP
  • Columnstore
  • Python
  • Compression
  • Always Encrypted
  • Row Level Security
  • Dynamic Data Masking
  • Service broker
  • Change Data Capture (CDC)
  • Partitioning
  • Auditing
  • CLR
  • JSON
  • XML
Security
  • Active Directory authentication coming soon!
What is not available on Linux?
  • DB Mail
  • Alerts
  • FileTables
  • Stretch DB
  • PolyBase
  • XPs
  • Mirroring
  • VSS Snapshots
Other services which are not available on Linux
  • SSAS
  • SSRS
  • SSIS
  • R service
  • MDS
  • DQS

Windows based SQL Server tools like SSMS and Profiler works when connected to SQL Server on Linux. Native command line tools like SQLcmd, bcp and sqlpackage are also supported on Linux.
Microsoft is also planning to release a new cross platform database admin GUI tool for doing administrative tasks. WOO HOO! This tool will work on Windows, Linux and Mac OS. And this is actually an open source project which will be available on GitHub.

Go-ahead and get your copy of SQL Server 2017 CTP and start exploring these new features

Cheers,
Naveen

Sunday, 9 April 2017

Always good to know your GUEST in SQL Server

Few days back came across an interesting issue, which was new for me. Application owner buzzed me and raised concerns about the SQL Server security setup.

App.Owner: We have some serious issue with our database security. I fear wrong people having elevated access to our data.
Me: Ok, Let me have quick look and get back to you.
App.Owner: Yes please. We need to fix this now.
Me: Did a quick check and everything seems to be fine. You’re ID with db_owner and other users with read access to the database.
App.Owner: I was also under the same impression. But today, I came to know there are other users who were also are also able to modify the data. That’s not at all good.
Me: hmm that’s strange. I will do a complete check to figure out the loophole.
App.Owner: Thanks. I will wait to hear from you.
Me: Okay. Ahh Found the suspect. All those privileges were getting transmitted from guest user. I could see someone had mistakenly provided extra permission to guest user, which is not at all required for this environment. Now things are back to normal. Please have a look from your end and let me know you if you have any questions
App.Owner: Great! Thanks for fixing this. Have a good day
Me: You too, have a good day!

In my case issue was with guest user permission. Let’s see the same in demo

-First we will create a new database named ‘TESTDB’. Then will check the status of guest account.


Note: If guest user is enabled in Model database, the same will get applied to newly created database

-Now we will create a SQL Login ‘UserA’, a new table ‘EPL’ and insert 3 records.


We have just created a SQL Login it’s not mapped to any of the database. At instance level also no permission is provided.

Now let’s try doing a simple select on table EPL using UserA.


As expected, ‘UserA’ is not able to fetch the data from TESTDB. Now let’s try enabling and providing read and write permission to ‘Guest’ user in TESTDB. You cannot enable/disable Guest user through GUI, it can be done only with T-SQL.

To Enable Guest Account:

USE [DATABASE_NAME]
GO
GRANT CONNECT TO GUEST
GO

To Disable Guest Account:

USE [DATABASE_NAME]
GO
REVOKE CONNECT TO GUEST
GO


Command completed successfully. Now let’s try running some commands.


So now UserA is able to read and insert records in TESTDB. The same task can be performed by all users associated with the instance. When Guest user is enabled, it will authorize access for logins which are not mapped to the database.

Things to know about Guest user

  • It’s always recommended to disable guest user for user database, unless you have any specific/special requirement.
  • Guest user cannot be dropped, but can be disabled/enabled.
  • Guest user cannot be disabled for Master and Tempdb database.
  • On msdb database guest user should not be disabled. If you have any plans to do so, please read this.

Do you use Guest user? On what scenarios you use them?
Please share your thoughts via comments below.
 
Cheers,
Naveen

Monday, 27 March 2017

Enabling trace flags in SQL Server vNext CTP 1.3 on Linux

In my previous post, I have shown you some of the trace flags which are enabled by default on SQL vNext CTP 1.3 Instance on Linux.


In this post we will see how to add trace flags to SQL Startup parameter on Linux.

In windows world, to add trace flag to start-up parameter all we had to do is open SQL configuration manager-> Right click on SQL Service and open its properties -> Navigate to startup parameters tab and add your trace flags.


In Linux world, everything is at file level. All configuration items are stored in a file. To make configurational changes to SQL Instance we will be using mssql-conf under /opt/mssql/bin/.


Now let’s see how to add trace flag to SQL Startup Parameters

If you are already in /opt/mssql/bin/ directory just run

./mssql-conf traceflag 1117 1118 1222 3226 on

Say if you are in /opt directory. Your command will be something like

./mssql/bin/mssql-conf traceflag 1117 1118 1222 3226 on


Now we have successfully added trace flag 1117, 1118, 1222 and 3226. We have to restart SQL service to apply these changes.

To check the status of SQL Service

Systemctl status mssql-server.service


To restart SQL Service

Systemctl restart mssql-server.service

Now let’s connect to the SQL instance and check if the trace flags are enabled


In the next blog post, I will show you how to change your SQL Instance collation on Linux.

Cheers,
Naveen

Thursday, 2 March 2017

Trace Flags on SQL Server vNext CTP 1.3

Mid of February Microsoft announced the release of SQL Server vNext CTP 1.3. Below is the list of some of the key enhancements done on database engine


  • Indirect checkpoint performance improvements.
  • Cluster-less Availability Groups support added.
  • Minimum Replica Commit Availability Groups setting added.
  • Availability Groups can now work across Windows-Linux to enable cross-OS migrations and testing.
  • Temporal Tables Retention Policy support added,
  • Online non-clustered columnstore index built and rebuild support added


One thing which surprised me is by default you get a set of trace flags enabled globally. SQL Server vNext CTP 1.3 we have 7 trace flags enabled by default whereas in CTP 1.2 we'll get 6.

Click on the image for better readability


Have you used the below listed trace flags?
Can you share your thoughts on the comments section about these traces flags?

T835
T2563
T3105
T5504
T6529
T8020
T8415

In the next blog post we will see how to set trace flag on SQL startup parameter on Linux.

Cheers,
Naveen

Wednesday, 8 February 2017

SQL Server vNext CTP 1.2 Installation on Red Hat Enterprise Linux 7.2

As most you all know SQL Server is now available on Linux platform. I know everyone was super excited about this news. Just imagine 5 years ago, if you tell someone how awesome it is to have SQL Server on Linux? I am sure, they would have laughed at you. But now it’s happening in reality. It is a BIG BIG BIG move from Microsoft to make SQL Server available on Linux. To know more about the announcement of SQL Server on Linux click here.


 “SQL Server’s proven enterprise experience and capabilities offer a valuable asset to enterprise Linux customers around the world. We believe our customers will welcome this news and are happy to see Microsoft further increasing its investment in Linux. As we build upon our deep hybrid cloud partnership, spanning not only Linux, but also middleware, and PaaS, we’re excited to now extend that collaboration to SQL Server on Red Hat Enterprise Linux, bringing enterprise customers increased database choice.”
            -Paul Cormier, President, Products and Technologies, Red Hat

In this blog post we will see high level architecture, How to install RHEL 7.2 on VMware Workstation, Run through some of the basic commands and at last we will have our SQL Server installed on it with tools.

Linux Architecture

Thanks to Anthony Nocentino. Got this image from one of his PASS Virtual Chapters


I hope above picture gives you a basic overview about Linux architecture. At the bottom we have hardware components which consist of physical resources like CPU, Disk and Memory which is similar to Windows platform. On top of that we have Kernel (Kernel Space), which is the core element in Linux operating system. This portion manages the operating system resources. On top of Kernel space you got shell using which users can interact with kernel to manage applications or programs. So users use shell to interact with Kernel and kernel is linked with the core hardware components. There are different ways to interact with Linux systems. In this demo we will use the console to do it and you can also use SSH terminal. Before jumping into how to install Linux, keep one thing in mind “Everything in Linux is treated as files/file system”.

You can refer the below image to know what each directory represents


How to install Red Hat Enterprise Linux (RHEL) 7.2 on VMware Workstation

You can download free RHEL 7.2 ISO image from here and also get yourself registered on the Red Hat site because you will need your login details at later stage. Download VMware Workstation from here or you can use other providers as well.

After downloading, install you’re VMware Workstation and navigate to File-> New Virtual Machine (Ctrl + N).
Then select custom installation and click on next. On the next screen we can go with the default, click on next.


Now on the Guest Operating System Installation window, select “Installer Disc image file (iso): “ and provide the path to RHEL .ISO image file with file name, click on next.


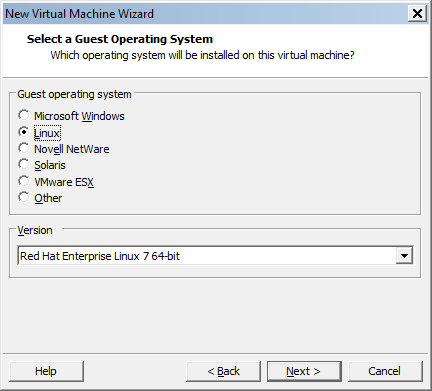
On the next window, select Linux under Guest operating system and on the version drop down select ‘Red Hat Enterprise Linux 7 64-bit’. 


Enter the virtual machine name and location where its supported files should be placed.


Select the number of processors. I have selected total processor core as 4.


Provide 4 GB of memory to the OS as that is one of the prerequisite for installing SQL Server on Linux (Approx you'll need at least 3.5 GB). On the network type, select the default type “network address translation (NTA)”. On I/O Controller types select “LSI Logic” and click on next. Disk type as ‘SCSI”. 

On the next window to select the disk, we can use a new virtual disk since this is a fresh installation for demo.


Allocate 25 GB of disk size and split virtual disk into multiple files.

Note: When I tried to configure it with single virtual disk file. During the OS start-up it was not able to see the disk files. When I tried with splitting the virtual disk into multiple file sit worked.


On the next window provide the path where you want to place all the virtual disk files and click on next. Now we will end up with the final screen which will give you a summary about all inputs which we provided. You can just review it once and click on finish.

Now let’s power on the virtual machine to complete the OS installation.

Select Install Red Hat Enterprise Linux 7.2 and hit Enter.


Setup will load other things and you will land at the below screen to select the language. Select your appropriate language and click on continue


Now you will be at Installation Summary Page. Set the Time Zone and language under Localization. Click on Security and select default profile, click on done.


Under Software, click on ‘Software Selection”. Select “Infrastructure Server” under base environment. You can also select server with GUI. But for this demo I am using Infrastructure Server.


Click on Installation destination under system and select the local standard disk which we configured earlier.


KDUMP is enabled by default (for this demo I will be disabling). Click on KDUMP and uncheck “Enable KDUMP” and click on done

Click on Network & Host Name and turn on the Ethernet.


Now we are all set to start the installation. On the summary page click on Begin Installation.

So far so good. Our installation is started and we are still left with couple of tasks


-Set root password (Root user is something like Administrator user which we have in windows. It’s a super user with all access to the box)
-Create new user 

Once you completed the above two steps, wait for the installation to complete. Finally click on reboot to complete the installation and you’re all set to use your RHEL virtual machine.


Above listed commands are easy for practising and you get some hands on with the OS (if you are new to Linux world, like me).

Installing SQL Server vNext CTP 1.2 on RHEL 7.2

Here is the link to Microsoft documentation on installing SQL Server vNext on RHEL.

I have logged in with root user, so I am leaving the first step from the documentation and then we have to download the Microsoft SQL Server Red Hat Repository Configuration file by running the below command.

curl https://packages.microsoft.com/config/rhel/7/mssql-server.repo > /etc/yum.repos.d/mssql-server.repo


Once the repository is configured. Now we can install SQL Server by running below command

yum install –y mssql-server


In the above screenshot (during the mssql-server package installation), there is a message saying “This system is not registered with Red Hat Subscription Management. You can use subscription-manager to register it.”

Follow the below steps to completed the registration for Red Hat Subscription

-Run subscription-manager register. This will ask you to enter the username which is your email ID using which you registered in Red Had site and enter the password.


Now our registration is successfully and we also have a registration ID generated.

Use below command to check list of subscriptions 

subscription-manager list

By doing this we can fix the above warning message. But wait, still its not completed. Next you would be seeing a message “This system is registered to Red Hat Subscription Management, but is not receiving updates. You can use subscription-manager to assign subscriptions”.
Now we have to assign the registered ID for subscriptions. Run the below command to get the Pool ID

Subscription-manager list

Get the Pool ID and use it in the below command for subscription.

subscription-manager attach --pool=POOL_ID

Once our installation is completed and there is a message saying run this setup file to complete the setup. So this configuration file will set the password for SA account. And just for our learning purpose we will not start the service now we try to start the service manually.

/opt/mssql/bin/sqlservr-setup


With this we have completed the installation of SQL Server. Now we have to install tools, so that we can connect to the SQL instance.

First we have to download the configuration files from the repository using below command

curl https://packages.microsoft.com/config/rhel/7/prod.repo > /etc/yum.repos.d/msprod.repo

Once the repositories are loaded and then we are good to go with installation by running the below command

Yum install –y mssql-tools


Before connecting to the SQL Instance we have to start the service. Now let’s see how to check the service status and start it.

To get the list of services running on your machine run the below command

Systemctl

To get the service status of SQL Server

Systemctl status msssql-server


It says service is disabled and its inactive (dead). So first we have to enable the service by running the below command

Systemctl enable mssql-server


Run the below command to start the service

Systemctl start mssql-server


When you run the above command with –l parameter it gives you more cool information.


And finally we are going to connect to our SQL Server vNext instance!!

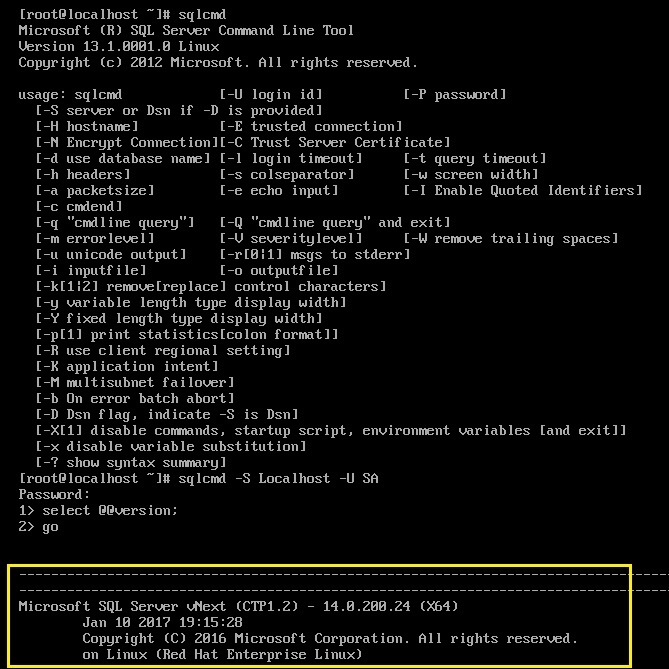
Sqlcmd –S Localhost –U SA #Hit enter and provide the password for service account


Happy learning!!

Cheers,
Naveen